Make a Beautiful Crochet Calla Lily With This Simple Pattern
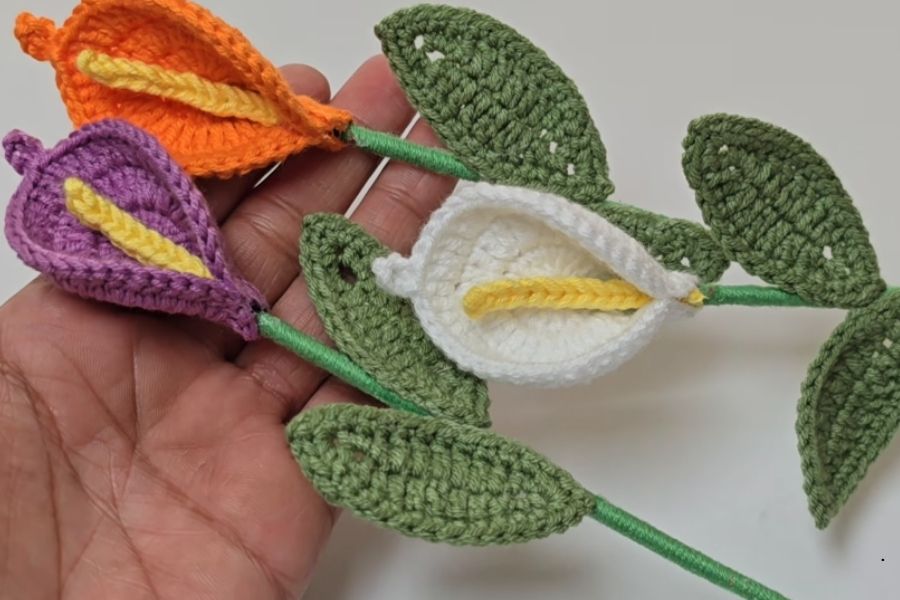
Bring a fresh, aesthetic, and stylish touch to your home decoration by crafting your very own handmade crochet calla lily flower. This easy project uses basic stitches to create a stunning botanical piece.
Materials Needed
To start your project, gather your favorite cotton yarn in vibrant flower colors along with green yarn for the leaves. You will also need a 2.50 mm crochet hook, a wooden skewer painted green for the stem, and some craft glue for assembly.
If your cotton yarn is quite thin, you can fold it in layers to achieve the right thickness for certain parts like the center bud.
Crocheting the Main Flower Body
Begin your flower by making a magic ring. For the first row, chain two and work fourteen double crochets right into the ring, giving you a total of fifteen double crochets including your starting chain. Finish this round by working a slip stitch into the top of your very first loop.
For the second row, chain two and make two double crochets into the top of every single stitch from the previous row, bringing your total count to thirty double crochets. Slip stitch to join and chain two to begin the third row. In this row, alternate between making two double crochets and one double crochet in the stitches below, adding a chain five and a slip stitch detail near the front, and continuing the pattern until you reach forty-five total double crochets. Finish up by cutting your yarn and neatly hiding the tail through the loops at the back.
Crafting the Central Bud and Leaves
The middle bud is created using cord work techniques. Cut a piece of yarn measuring about 120 to 130 centimeters, fold it, and tie knots in the middle point repeatedly about eight to nine times to form a textured yellow center piece.
For the green leaves, start with a foundation chain of ten. Work a combination of single crochets, half double crochets, double crochets, and triple crochets down the chain, turning around the end with extra stitches and chains to shape a realistic leaf silhouette. Make a total of two lovely leaves following these steps.
Assembly and Final Touches
Take your painted wooden skewer and use craft glue to attach the yellow textured bud right at the top end. Next, glue the main colorful flower body around the center. Finally, attach your green leaves securely to the lower stem to complete your handmade flower.
When working with thin cotton yarn, folding the strand in half helps give the central bud enough volume and stability so it stands up nicely inside the flower petal.
Taking your time to weave in yarn tails securely at the back of each crocheted piece ensures your finished flower looks neat and professional from every single angle.
Using a steady hand when applying craft glue to the wooden skewer keeps the assembly clean and prevents any sticky residue from showing on your finished decorative stems.
What color yarn will you choose for your first handmade calla lily flower?