Crochet Red Rose Free Pattern for a Lovely Gift
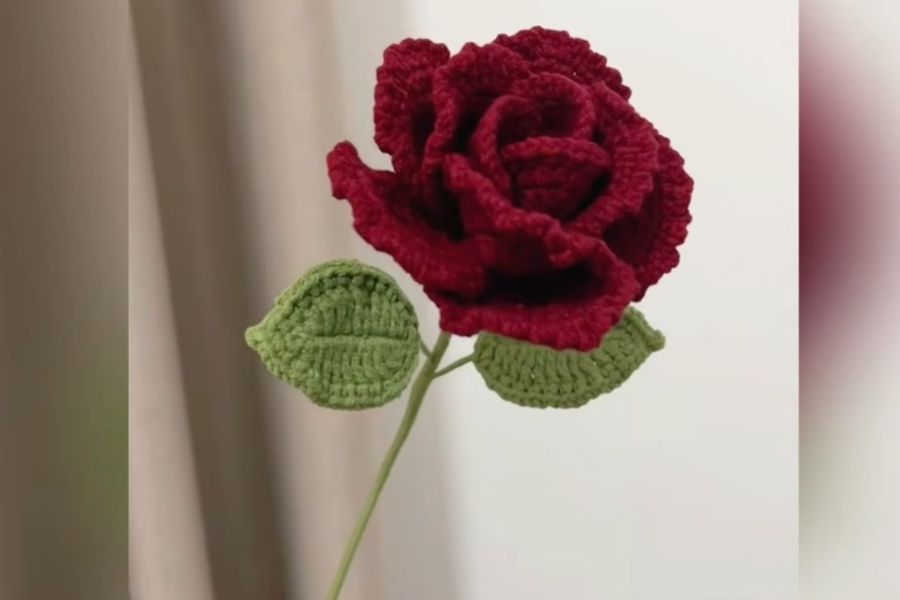
Imagine giving someone a flower that lasts forever. A beautiful red rose that you made with your own hands is truly special. This little bloom can say so much, from ‘I love you’ to ‘I’m thinking of you’. In this article, you will learn exactly how to crochet a stunning red rose, perfect for a thoughtful, handmade gift. We will go through everything step-by-step, making it easy and fun. By the end, you’ll have your very own lovely rose to share.
Why a Crocheted Rose makes the Best Gift
A handmade rose shows you put time and love into making it. Anyone can buy a real flower, but it takes patience and skill to crochet one. Plus, this rose will never wilt or die. It will be a sweet reminder of your affection for years.
The vibrant red color is classic and beautiful. Red roses often mean love and deep respect. Giving a red rose you crafted yourself makes the meaning even more powerful. It’s a classic choice that’s always in style.
You can customize your crocheted rose too. You can choose different shades of red, from a deep wine color to a bright poppy red. You can even adjust the size by using different yarns or hooks.
These flowers have so many uses beyond just being a gift. A single stem can look elegant in a bud vase. You can make a whole bouquet for a centerpiece that will impress everyone. Or, you can make a pin and attach it to a coat or bag for a pop of color. The possibilities are endless!
Let’s get your hooks ready. You are about to make something beautiful.
Get Your Materials Ready
You will need a few simple things for this project. Start with some beautiful red yarn. It’s a good idea to pick a soft yarn that won’t split easily. You can find nice, affordable yarns for this.
Next, you need green yarn. This is for the leaves and the stem. You should also get a crochet hook in the right size for your yarn. Check the yarn label to see what size hook it recommends.
For the center of the stem, a floral wire is helpful. It gives the rose structure and lets you position it perfectly. Make sure you also have some scissors and a yarn needle handy for weaving in ends.
The Basic Crochet Stitches You’ll Need
This rose pattern uses only a few basic stitches. If you know how to make a chain stitch and a single crochet, you’re well on your way. These are the building blocks of most crochet projects.
You will also use the double crochet stitch. This stitch is taller than a single crochet and helps create the petals’ shape. Another stitch you might use is the half-double crochet, which is in between single and double crochet in height. All these are easy stitches to learn, and they work together perfectly to make a rose.
If you are new to any of these stitches, don’t worry. There are lots of simple guides and videos online to show you how. A few practice stitches on some scrap yarn will help you get comfortable.
Step-by-Step Instructions to Make a Rose
We will break it down into easy steps. We will make the petals first and then put them together. Following the steps one by one will make it simple.
Start with the Petals
The central structure of the rose is built from many individual petals. You will start by making several smaller petals. These will go in the very center of your rose.
You can make a few larger petals too. These will go on the outside to give your rose fullness. Each petal is made separately. A small chain is created, and then the stitches are worked into it to make the petal shape.
Don’t be afraid to make a few practice petals. This will help you get the shape and tension just right. You want your petals to look consistent.
Making the Stem and Leaves
Now we will switch to your green yarn. The stem is quite simple to make. You can crochet directly around your floral wire or make a tube of single crochets and slide it over.
Next, you will crochet some leaves. You can make one or two for each rose. They are easy to make with a few increase and decrease stitches to get that leaf shape. These leaves really complete the natural look.
You can attach the leaves to the stem with simple stitches or hot glue. Take your time to get them positioned where you like them best. The extra effort makes a big difference.
Putting Your Rose Together
This is the best part where you see your rose come to life. You will take the stem with the leaves and start assembling the petals. Start with the smallest petals and attach them tightly around the top of the stem.
Then, you can layer the medium and larger petals around the center. Use your yarn needle and some red yarn to sew them securely. Wrap each petal slightly over the edge of the previous one. This creates the spiral look of a blooming rose.
Don’t rush this step. Adjust each petal carefully so it looks natural. With a little patience, you will have a beautiful, perfectly formed rose.
Top Tips and Tricks for a Perfect Rose
To make your rose petals look natural, you can lightly starch them. A light spray will hold the shape without making them too stiff. You can even add a touch of color to the edges with a marker for a realistic look.
Make sure your stitches are not too tight or too loose. Consistent tension will make your petals all the same size and the final rose will look much neater. You might find that your tension improves with practice.
You can add a few extra petals for a fuller, more open bloom. Or, make fewer petals for a more compact rosebud. Every rose will be a little unique, which is wonderful!
Always use sharp scissors for a clean cut. Dull scissors can fray your yarn and make it hard to finish your project neatly. Keep your scissors handy as you work.
A small dab of hot glue can help hold things in place. You can use it to secure the leaves to the stem or to attach the base of the petals. Just be careful not to use too much, or it might show.
Remember that practice makes perfect. Your first rose might not be ideal, and that’s okay. With each one you make, your stitches will become even and your roses will look better.
Don’t forget to have fun! Crocheting is a creative and relaxing hobby. Enjoy the process of creating something beautiful from just a ball of yarn and a hook.
Wrapping Up Your Beautiful Creation
Once you’re done, trim any excess yarn and weave in the ends. Your handmade red rose is now ready to be a wonderful gift for someone special. Or, perhaps you’ll keep it for yourself to enjoy!
This is a gift that truly keeps on giving. Its beauty will never fade. Your simple and thoughtful gift will be cherished for a long time. You can make many roses in different colors to create a stunning bouquet.