Easy Hello Kitty Crochet Pattern for Beginners
Want to make your own little Hello Kitty friend? If you are new to crochet, this is the perfect first big project for you! You can use very basic stitches to bring this classic, adorable character to life.
Getting to Know the Project
The Hello Kitty figures here are a type of small crochet toy called ‘amigurumi’. These are worked in rounds, starting from a small center and growing.
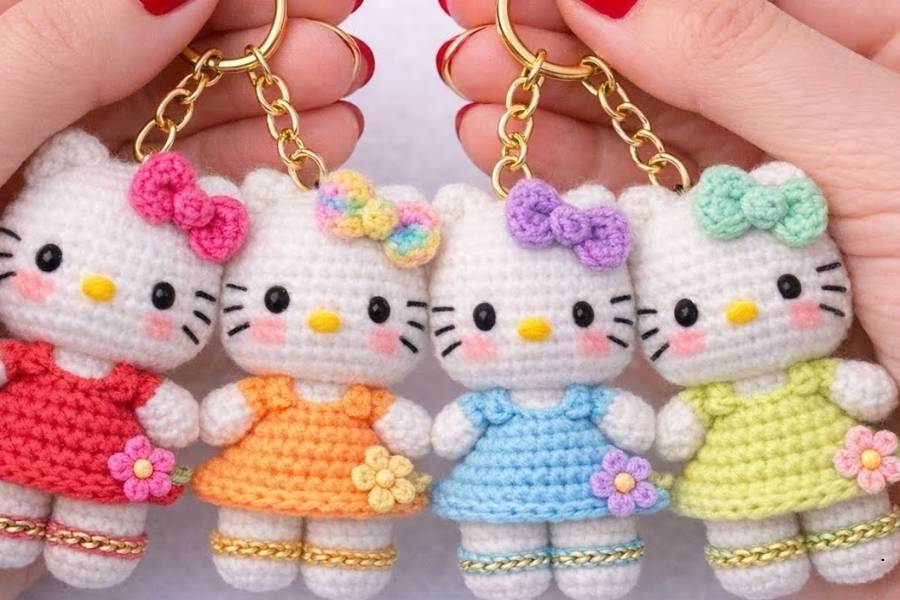
All four versions here are essentially made from the same simple pattern, just with different yarn colors and small add-ons. They use a very smooth yarn, probably cotton or a cotton blend, which shows off the tidy stitches.
Each one is about the size of a hand, making them quick to finish. Once done, you can turn them into keychains, bag charms, or just collect them! This pattern is designed so you can successfully complete your first little toy.
What You Need to Get Started
Since we are aiming for smooth, sturdy results, a cotton or cotton-blend yarn in a light weight (like size 3 or 4) is best. You will need white yarn for the head and body. For the outfit, pick your favorite color! The examples here show red, orange, blue, and lime green. A crochet hook that is a little smaller than what the yarn label recommends will help keep your stitches tight. You will also need: black safety eyes, yellow thread or thin yarn for the nose, black thread for the whiskers, stuffing, and a yarn needle to sew it all together. The pretty gold chain for the feet is optional but looks great!
A Simple Design with Big Results
This beginner pattern uses only two types of stitches: the single crochet (sc) and a very simple decrease stitch. These are the building blocks of almost all amigurumi toys. You will learn how to make a perfect sphere for the head and a rounded body. The little ears are just tiny triangles worked separately and sewn on later. The most rewarding part is making it unique with small details. You get to sew on the eyes, embroider a yellow nose, and add three black whisker lines on each side. The cutest part is adding a tiny flower to the dress or a colorful bow, like the lovely rainbow and purple ones in the example.
Easy Tips and Tricks for Beginners
- Tight Stitches Are Key: Keep your single crochet stitches close together. This stops the stuffing from showing through when your toy is all finished. If your stitches look loose, use a smaller crochet hook.
- Counting is Important: Always count your stitches at the end of every round to make sure your shape is correct.
- Stuff a Little at a Time: It’s better to add stuffing slowly and firmly rather than trying to cram a big amount in at once. This helps you shape the toy perfectly.
- Secure All the Pieces: When you sew the head, body, ears, and arms together, use strong stitches. You don’t want a leg or an arm to fall off later! Use your yarn needle to pull the yarn tails inside the body.